Bucket instructions:
- Go from bottom of first bucket and draw line 2" (~5 cm) up from the end around the entire width of the bucket
- Repeat above step, but use second bucket and draw line 3 3/4" (~9.5 cm) around width of bucket
- Using pliers (or other tool), remove handles from bucket
- Pick a point on the line of each bucket and drill a hole big enough for blade of jigsaw to enter
- Use jigsaw to cut along line of each bucket; dispose of end pieces.
- Flip first bucket upside down (keeping lid attached) and let it sit on table. With second bucket, take lid off and keep bucket upright. Place second bucket inside of first bucket; this should be a tight arrangement, but will prevent any gas or water leakages.
- On second lid, find center point and draw circle with diameter 3 3/4" (~9.5 cm)
- Use drill to make a hole on one point of circle on lid; use jigsaw to cut out circle
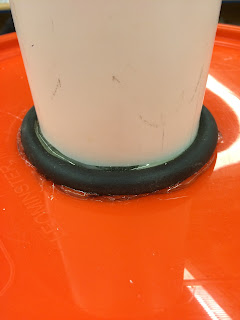
- Stick PVC pipe through this circle; should be wide enough to push PVC pipe through and hold it in place
- Take a 13 1/2" (~34 cm) measurement of foam tube and use glue to affix foam tube to PVC pipe at approximately 4" from the top of PVC pipe. When PVC pipe is sitting inside the circle of the top bucket lid, this foam should touch the bucket lid, leaving 4" of PVC pipe above lid and 15" of PVC pipe below lid.
- Glue the foam to the lid and make the seal airtight with caulking glue. Use a generous amount and leave overnight to dry.
Stick the threaded part of the valve into the hole, and screw on the brass fitting from the inside. Thread two 8/32" screws through the smaller holes, and secure them with two 8/32 nuts on the inside. Seal the valve in place using a generous amount of caulking, both on the inside of the bucket and on the outside around the water valve. This needs to be airtight and leakproof.
13. To attach the gas valve (red), drill a .65" diameter hole in the top bucket 5.25" down from the lid. Insert the longer end of the valve into the hole, and attach the thin fitting from the inside of the bucket. Secure with caulking, sealing any gaps on the outside and the inside.


No comments:
Post a Comment